



 By Tech Warmup
By: A fellow 3D printing enthusiast who has too many wires lying around
Okay, let’s be real for a second. We love our Ender 3s. They are the rugged, slightly temperamental, but loyal workhorses of the 3D printing world. But sometimes? Sometimes I don’t want to wait four hours to print a Benchy just to test my bed leveling. Sometimes, I just want to make something fast.
Enter the dark side of Ender 3 ownership: Plotter Mode.

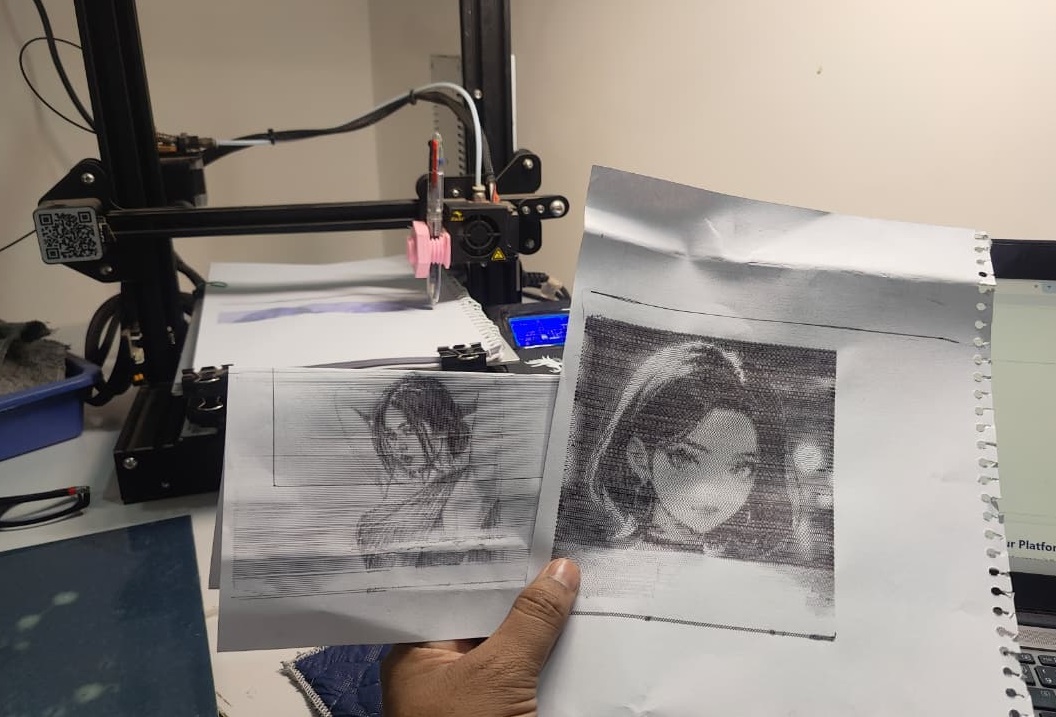
In about 20 minutes (and with $0.50 worth of filament), you can turn that plastic-melting machine into a high-precision drawing robot. It’s called a "Plotter," but I like to call it the "Sketch Machine."
The "Aha!" Moment
It hit me when I was trying to design a custom greeting card. I looked at my $600 paper printer, which was out of magenta ink (again), and then looked at my Ender 3. I thought: That thing moves in three dimensions with insane precision. Why can’t I just stick a pen in it?
Spoiler alert: You can.
The Magic Attachment
You don't need to take apart your hotend or void your warranty. You just need a Pen Holder. There are a million flavors of this on Printables and Thingiverse, but the concept is the same: a little bracket that bolts onto your existing X-axis carriage .
Personally, I printed the F.S. Plotter attachment. It is spring-loaded, which is a game-changer. It lets the pen "float" a little bit so it doesn't dig into the paper if your bed isn't perfectly flat (and let's be honest, on an Ender, it rarely is) .
What you’ll need:
-
20g of PLA/PETG (just print the bracket)
-
Any pen you have lying around (Sharpies work best, but gel pens look incredible)
-
A small spring (check your junk drawer—or steal one from a clicky pen)
The "Software" Hack (It’s Easier Than You Think)
Here is where people get scared. They hear "G-code" and run for the hills. Don't.
We are going to use Inkscape. It’s a free vector program. You draw something (or download a cool SVG of a skull or a mountain scene), and then you download an extension called "gcodeplot" .
This extension does the magic: It turns your drawing into G-code.


The "Hotend" Trick
The sneakiest part? You don't need to unplug your hotend. Just set your slicer (Cura/Prusa) to zero degrees for the nozzle temp. The printer will happily move the XY axes around drawing your picture while the extruder stays cold. Just remember to turn off the "Filament Runout Sensor"!
The Results Are Addictive
The first time you hit "Print" and the Ender 3 starts moving with a Sharpie scratching across copy paper... it feels illegal.
It’s quiet. It’s fast. And suddenly, you’re printing:
-
Custom wedding invitations no one else has.
-
Fabric patterns (a fabric pen + a flat build plate = custom t-shirts) .
-
Vinyl stickers (swap the pen for a vinyl blade).
Pro-Tips from a Sketchy Veteran
-
The Z-Offset is Everything: Use a piece of paper to set the gap, just like you do for your nozzle. You want the pen to touch the paper, but not punch a hole through it.
-
Tape Down Your Paper: The build plate vibration will make your paper walk away. Use blue painter's tape on the corners.
-
Go Slow: Don't print at 100mm/s. Dial it down to 40-50mm/s for clean lines .

Final Verdict
Doing this makes you look at your printer differently. It’s not just a plastic extruder; it’s a CNC machine for everything.
So, go dig out that Ender 3. Print the part. Stick a pen in it. You’ve got a sketch machine waiting to be unleashed.
Happy drawing (and printing)!
By Tech Warmup
By: A fellow 3D printing enthusiast who has too many wires lying around
Okay, let’s be real for a second. We love our Ender 3s. They are the rugged, slightly temperamental, but loyal workhorses of the 3D printing world. But sometimes? Sometimes I don’t want to wait four hours to print a Benchy just to test my bed leveling. Sometimes, I just want to make something fast.
Enter the dark side of Ender 3 ownership: Plotter Mode.
In about 20 minutes (and with $0.50 worth of filament), you can turn that plastic-melting machine into a high-precision drawing robot. It’s called a "Plotter," but I like to call it the "Sketch Machine."
The "Aha!" Moment
It hit me when I was trying to design a custom greeting card. I looked at my $600 paper printer, which was out of magenta ink (again), and then looked at my Ender 3. I thought: That thing moves in three dimensions with insane precision. Why can’t I just stick a pen in it?
Spoiler alert: You can.
The Magic Attachment
You don't need to take apart your hotend or void your warranty. You just need a Pen Holder. There are a million flavors of this on Printables and Thingiverse, but the concept is the same: a little bracket that bolts onto your existing X-axis carriage .
Personally, I printed the F.S. Plotter attachment. It is spring-loaded, which is a game-changer. It lets the pen "float" a little bit so it doesn't dig into the paper if your bed isn't perfectly flat (and let's be honest, on an Ender, it rarely is) .
What you’ll need:
-
20g of PLA/PETG (just print the bracket)
-
Any pen you have lying around (Sharpies work best, but gel pens look incredible)
-
A small spring (check your junk drawer—or steal one from a clicky pen)
The "Software" Hack (It’s Easier Than You Think)
Here is where people get scared. They hear "G-code" and run for the hills. Don't.
We are going to use Inkscape. It’s a free vector program. You draw something (or download a cool SVG of a skull or a mountain scene), and then you download an extension called "gcodeplot" .
This extension does the magic: It turns your drawing into G-code.
The "Hotend" Trick
The sneakiest part? You don't need to unplug your hotend. Just set your slicer (Cura/Prusa) to zero degrees for the nozzle temp. The printer will happily move the XY axes around drawing your picture while the extruder stays cold. Just remember to turn off the "Filament Runout Sensor"!
The Results Are Addictive
The first time you hit "Print" and the Ender 3 starts moving with a Sharpie scratching across copy paper... it feels illegal.
It’s quiet. It’s fast. And suddenly, you’re printing:
-
Custom wedding invitations no one else has.
-
Fabric patterns (a fabric pen + a flat build plate = custom t-shirts) .
-
Vinyl stickers (swap the pen for a vinyl blade).
Pro-Tips from a Sketchy Veteran
-
The Z-Offset is Everything: Use a piece of paper to set the gap, just like you do for your nozzle. You want the pen to touch the paper, but not punch a hole through it.
-
Tape Down Your Paper: The build plate vibration will make your paper walk away. Use blue painter's tape on the corners.
-
Go Slow: Don't print at 100mm/s. Dial it down to 40-50mm/s for clean lines .
Final Verdict
Doing this makes you look at your printer differently. It’s not just a plastic extruder; it’s a CNC machine for everything.
So, go dig out that Ender 3. Print the part. Stick a pen in it. You’ve got a sketch machine waiting to be unleashed.
Happy drawing (and printing)!

Comments