





 By Tech Warmup
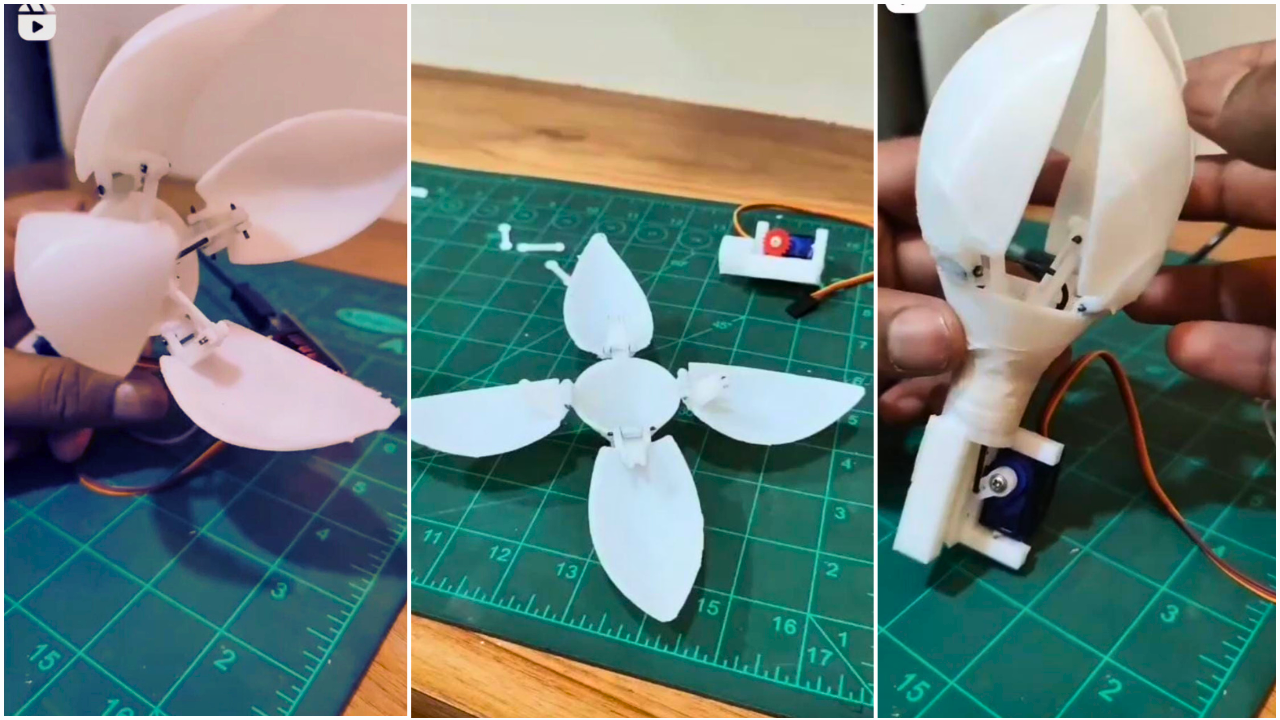
In this tutorial, you'll learn how to 3D print, assemble, and wire a mechanical electronic flower that opens and closes its petals—perfect for tech-art installations, robotics practice, or simply as a cool conversation piece.
Project Overview
This flower isn't just pretty—it's smart. Designed to simulate natural petal movement using servo motors, it can respond to signals from sensors, timers, or remote input via an Arduino or Raspberry Pi.
In this guide, you'll:
- 3D print the flower parts (petals, base, and hinges)
- Assemble the mechanical components
- Integrate servo motors and electronics
- Program the movement using Arduino
 |
 |
Materials & Tools
3D Printed Parts:
- 4x Flower Petals
- 1x Central Flower Base
- 4x Hinges / Mounts
- 1x Servo Arm Attachment
- Additional small support parts (brackets, spacers)
Electronics:
- 1x Micro Servo Motors (e.g., SG90)
- 1x Arduino Uno (or similar microcontroller)
- Jumper wires
- Breadboard or soldering kit
- Power supply (USB or battery pack)
Tools:
- 3D Printer with at least 200x200mm build area
- Super glue or screws (if needed)
- Screwdriver set
- Hot glue gun (optional)
3D Printing Instructions
- Download the STL Files
Ensure you have all required parts from the project files. - Slicer Settings
- Layer height: 0.2mm
- Infill: 50%
- Supports: Enabled for overhangs
- Material: PLA or PETG
- Print Orientation Tips
- Petals: Print vertically to maintain smooth surface detail
- Base: Flat on bed for strength
- Supports may be required on curved features
Assembly Steps
- Attach Hinges to Petals
- Connect each petal to a hinge or mount using printed slots or screws.
- Install Servo Motors
- Insert one servo into each hinge base. Secure with glue or screws.
- Route servo wires toward the central cavity.
- Assemble Flower Base
- Mount the central base onto a stand or anchor point.
- Attach all petal-hinge assemblies to the base.
- Connect Servo Arms
- Use custom printed servo horns or attach arms directly to petals.
https://www.youtube.com/shorts/eNgq9m6cogo
Wiring & Coding

Servo Wiring:
Connect all servos to the Arduino:
|
Servo |
Motor Arduino |
Pin |
|
1 |
Red Wire |
5V |
|
2 |
Brown wire |
GND |
|
3 |
Yellow Wire |
PWM Pin 9 |
Arduino Code (Example):
You can simply use Arduino ide Sweep program or code is given below
|
|
Customization Ideas
- Add RGB LEDs inside the flower for glowing effects.
- Use light or sound sensors to trigger the flower to open.
- Create multiple flowers for a kinetic garden installation!
By Tech Warmup
In this tutorial, you'll learn how to 3D print, assemble, and wire a mechanical electronic flower that opens and closes its petals—perfect for tech-art installations, robotics practice, or simply as a cool conversation piece.
Project Overview
This flower isn't just pretty—it's smart. Designed to simulate natural petal movement using servo motors, it can respond to signals from sensors, timers, or remote input via an Arduino or Raspberry Pi.
In this guide, you'll:
- 3D print the flower parts (petals, base, and hinges)
- Assemble the mechanical components
- Integrate servo motors and electronics
- Program the movement using Arduino
|
|
Materials & Tools
3D Printed Parts:
- 4x Flower Petals
- 1x Central Flower Base
- 4x Hinges / Mounts
- 1x Servo Arm Attachment
- Additional small support parts (brackets, spacers)
Electronics:
- 1x Micro Servo Motors (e.g., SG90)
- 1x Arduino Uno (or similar microcontroller)
- Jumper wires
- Breadboard or soldering kit
- Power supply (USB or battery pack)
Tools:
- 3D Printer with at least 200x200mm build area
- Super glue or screws (if needed)
- Screwdriver set
- Hot glue gun (optional)
3D Printing Instructions
- Download the STL Files
Ensure you have all required parts from the project files. - Slicer Settings
- Layer height: 0.2mm
- Infill: 50%
- Supports: Enabled for overhangs
- Material: PLA or PETG
- Print Orientation Tips
- Petals: Print vertically to maintain smooth surface detail
- Base: Flat on bed for strength
- Supports may be required on curved features
Assembly Steps
- Attach Hinges to Petals
- Connect each petal to a hinge or mount using printed slots or screws.
- Install Servo Motors
- Insert one servo into each hinge base. Secure with glue or screws.
- Route servo wires toward the central cavity.
- Assemble Flower Base
- Mount the central base onto a stand or anchor point.
- Attach all petal-hinge assemblies to the base.
- Connect Servo Arms
- Use custom printed servo horns or attach arms directly to petals.
https://www.youtube.com/shorts/eNgq9m6cogo
Wiring & Coding
Servo Wiring:
Connect all servos to the Arduino:
|
Servo |
Motor Arduino |
Pin |
|
1 |
Red Wire |
5V |
|
2 |
Brown wire |
GND |
|
3 |
Yellow Wire |
PWM Pin 9 |
Arduino Code (Example):
You can simply use Arduino ide Sweep program or code is given below
|
|
Customization Ideas
- Add RGB LEDs inside the flower for glowing effects.
- Use light or sound sensors to trigger the flower to open.
- Create multiple flowers for a kinetic garden installation!
Comments